September 29, 2014

Create Your Own Vocabulary Games

If students aren't given opportunities to practice with vocabulary terms then they will never own them. Just doing homework isn't enough; students need multiple exposures to words in a variety of contents. I do this through a variety of vocabulary games, all of which can be played individually or in groups. Here's a look at five of those games.
My school recently purchased Sadlier-Oxford's Vocabulary Workshop to use with each grade level. In the past, I created a root-based vocabulary curriculum to use with my students, but I had to switch over to the Sadlier-Oxford program since my school bought the books and wanted to get their money's worth of usage.

Each Sadlier-Oxford unit includes twenty words, which is way too many for students to master in one week (I used to do just five a week when teaching roots). While in the past I could use a game to review the day of the quiz, with twenty words I decided to devote at least one day every two weeks (I teach a unit of twenty words every two weeks) to allow students more practice with the words.

If the students aren't given opportunities to practice with the words then they will never own them. Just doing homework isn't enough; students need multiple exposures in a variety of contents. I do this through a variety of vocabulary games, all of which can be played individually or in groups. Here's a look at five of those games.

Create your own vocabulary games for students to help them learn as they play. Here's one of five games that can be played individually or in groups.Game 1: Ask students to rate their reaction to situations. I ask them how happy they would be (1 = not happy at all to 5 = overjoyed) given a certain situation. Instead of ranking happiness, you could have students rank the amount of energy required for an action or activity, the cost, etc. This game allows students to see their vocabulary words used in different contexts. I try to make the contexts as relevant to students as possible.

Create your own vocabulary games for students to help them learn as they play. Here's one of five games that can be played individually or in groups.
Game 2: Ask students to identify the better example of the vocabulary word. This is a great way to practice the idea of shades of meaning. Like Game 1, this game also allows students to see their vocabulary words used in different contexts and I try to make the contexts as relevant to students as possible.

Create your own vocabulary games for students to help them learn as they play. Here's one of five games that can be played individually or in groups.
Game 3: Ask students to determine if the two given words are synonyms or antonyms. As the year goes on, you can incorporate words from past units as the synonym or antonym. 


Create your own vocabulary games for students to help them learn as they play. Here's one of five games that can be played individually or in groups.
Game 4: This is a "speed round." I give the students 3 minutes to try to unscramble all of their words; they must be spelled correctly to earn points. While it doesn't help students attach meaning to their words, it allows students to see which words they don't even recognize after a week of instruction and independent practice (their homework).


Create your own vocabulary games for students to help them learn as they play. Here's one of five games that can be played individually or in groups.

Game 5: My students' absolute favorite game is Pictionary. Every single student wants to draw and can hardly wait their turn. I love it because there is no preparation needed for this. Each artist gets a minute to draw and then teams get another minute to guess. I have them write down their answers instead of yelling them out to increase the number of students able to participate.  You have to trust that the artists won't just tell their teams the answers.

I love playing games on Mondays because it allows the students to talk and work together. It also means no paperwork or grading for me to start off the week. Finally, it allows me to identify the words which with students are still struggling and need more practice.

If you are also using Sadlier-Oxford Vocabulary Workshop, Level D with your students, you can find supplemental resources for those units here.

If students aren't given opportunities to practice with vocabulary terms then they will never own them. Just doing homework isn't enough; students need multiple exposures to words in a variety of contents. I do this through a variety of vocabulary games, all of which can be played individually or in groups. Here's a look at five of those games.


September 25, 2014

More Room for Writing: How to Get More Whiteboard Space

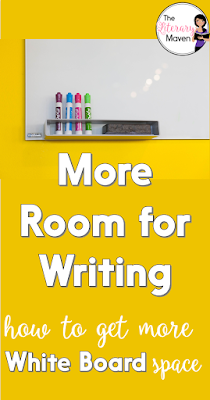
More Room for Writing: How to Get More Whiteboard Space. An easy, inexpensive solution to not having enough white board space in your classroom.
For those of you who have chalkboards and hate them or just never have enough whiteboard space, now you can add more!

More Room for Writing: How to Get More Whiteboard Space. An easy, inexpensive solution to not having enough white board space in your classroom. Lowe's and Home Depot (and any other similar store I'm sure) sell a construction material called shower board that works just like a whiteboard, meaning it's white and you can write on it and wipe it off just like a regular white board.

It comes in large sheets, maybe 4 x 12 feet or so, but they will cut it in the store for you into as many pieces/to whatever sizes you want. I had one sheet cut into six (about 2 x 3 feet). They are the perfect size for propping up on a chalkboard or whiteboard ledge.

I bought my shower board when I only had a chalkboard and not even much of that. Chalk = asthma and dusty fingers so I knew I needed another solution.

Another plus is you can write things out ahead of time and then put them up on your chalkboard or whiteboard ledge as needed (and then just stand them below when not needed as seen above). If you are in a district where you need to post your objective everyday but don't have a lot of board space this is very handy. 

You can also use them with the students when they are working in groups for playing Pictionary, solving math problems, anything for which you would use a mini whiteboard.

More Room for Writing: How to Get More Whiteboard Space. An easy, inexpensive solution to not having enough white board space in your classroom.

September 22, 2014

DIY Marble Jars For Building Positive Classroom Community

Build positive classroom community. All you'll need for these DIY Marble Jars is some empty containers, pom-pom balls, a ruler, and a permanent marker. They are inexpensive and easy to make, especially if you have multiple classes. As part of my effort to create a classroom community, I wanted to figure out a way to do "marble jars" with my high school classes. I know it works successfully with elementary school classes, so why not high school too?

I've always liked the idea of getting students to take responsibility for the way things are going in their classroom. I also like the idea of not singling students out all the time for positive (or negative) behavior. Sometimes high school students don't want to be recognized all the time for doing the right thing. And while I do reward individual students with a raffle ticket system, I also wanted a way to reward whole classes.

The first challenge was finding several decent size (non-breakable) containers since I would likely have five or six classes. All the containers had to be the same or classes would complain about another class having a small jar, hence being easier to fill.

Build positive classroom community. All you'll need for these DIY Marble Jars is some empty containers, pom-pom balls, a ruler, and a permanent marker. They are inexpensive and easy to make, especially if you have multiple classes.I decided to go with Powerade bottles, which my husband so kindly drank to empty for me. They are plastic so they won't break if there are any whoopsies around my desk, and large but not too large.


I washed out the bottles so they wouldn't be sticky or smell like Powerade and removed the label. I used nail polish remover to get off any of the sticky stuff remaining.


I decided to do different levels of rewards because I know my students do better with more immediate gratification. Level one is a night of no homework, level two is a class treat, and level three is a game day. All three are relatively no-cost or low-cost for me.

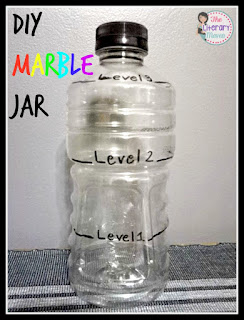
Build positive classroom community. All you'll need for these DIY Marble Jars is some empty containers, pom-pom balls, a ruler, and a permanent marker. They are inexpensive and easy to make, especially if you have multiple classes.To create the different levels, I measured the height of the bottle, divided it in three, and wrote on it with a permanent marker. Next time I'd look for a similar size drink bottle without the indents/hand grips. They were a bugger to write on.

The second challenge was finding an inexpensive, quiet replacement for marbles. First, I tried cotton balls, but they stuck together and were nearly impossible to get out of the jar. That was no fun.

I settled on using medium size pom-pom balls to fill the jars. You can get a pack of about 80 at the dollar store for $1. They are also colorful and more visually pleasing than cotton balls would have been.

To make sure I bought enough pom-pom balls, I filled one bottle up to see how many packages of pom-pom balls would be needed for one (about one and a half) and then multiplied that amount by the number of bottles. In the spirit of keeping this project low cost, I didn't want to have extra bags of pom-pom balls opened up and not returnable. They don't have a lot of uses in high school.


Finally, I needed on a container large enough to store all of my marbles. I chose this very large, also non-breakable container (it's an empty whey protein container, again courtesy of my lovely husband). Just as with the Powerade bottles, I washed it out to get rid of the powder and the smell and removed the label.

Build positive classroom community. All you'll need for these DIY Marble Jars is some empty containers, pom-pom balls, a ruler, and a permanent marker. They are inexpensive and easy to make, especially if you have multiple classes.To keep track of which jar belongs to each class, I just put a sticker with the period number on top of the lid (this class is a block period that takes place during first and second period). Now I just have to remember to fill them!


Build positive classroom community. All you'll need for these DIY Marble Jars is some empty containers, pom-pom balls, a ruler, and a permanent marker. They are inexpensive and easy to make, especially if you have multiple classes.

September 6, 2014

A Peek Into My English Language Arts Classroom

Decorating your English Language Arts classroom doesn't have to be costly. Get ideas for where to shop and look for inspiration (besides teacher stores) as well as practical tips for arranging your classroom.

I admit it, I'm a bit of a hoarder when it comes to teaching supplies, which means I never throw away anything I think I might be able to use again and many of the materials in my classroom are from my very first year of teaching. To celebrate my sixth year of teaching and my first time teaching a third year in the same school, I decided to go all out and get some new classroom decorations!

Classroom Decorating Tip: Teacher stores aren't the only places to find classroom decorations.My first purchases were at a Crate & Barrel outlet store. I found four pairs of paper lanterns (eight total) with a fireworks theme, intended for the Fourth of July, marked down on clearance as well as a matching square tablecloth. I used to have blue and green lanterns from IKEA hanging in my classroom, but after five years they were in pretty bad shape so I was excited to find new ones for cheap. The tablecloth could be used to top my desk or maybe a pair of filing cabinets. These small red baskets, also intended for Fourth of July and marked down, were the perfect size for pens, pencils, markers, crayons, etc. and will be used to pass out supplies to tables to prevent them from rolling all over the tables and onto the floor. With this red theme in mind, I picked up a couple red table runners from IKEA to top the three bookcases in my classroom.

Classroom Decorating Tip: Keep color schemes simples as not to overwhelm or distract students.My next step was to start thinking about the very large bulletin board at the back of my classroom. I usually cover it with black paper so that if when students write on it, the writing doesn't show. The black background also makes anything on white copy paper really pop. Since the other decorations I had purchased were red and white, I wanted to get borders and letters with the same color scheme as not to overwhelm or distract students with too many colors. First, I found some border at Staples (top left), but it was a little expensive, $7 for the pack, so I was excited to find red scalloped border with white polka dots at Becker's (bottom right), two packs for $6. I also found letters to match.

Classroom Decorating Tip: Don't forget to utilize your ceiling space.Once I could get into my classroom, I started decorating from the top down, which meant hanging my new lanterns first. Because I hung them over the vents along my windows, they "sway" in the wind. This whole wall of my room is completely covered with windows and you can see my view of Philadelphia’s skyline through the curtains. The amount of natural light in the room is great except when I'm trying to show movie clips, especially ones are set at night (think the balcony scene in Romeo & Juliet). The room doesn’t get dark enough, even with the shades down for the scenes to be seen clearly. On top of the heating vents along my windows are crates, one for each class period, where students keep their in-class folders. This prevents classwork from disappearing into the book bag/locker abyss. I teach primarily ninth graders so I have to balance teaching them how to be organized with the necessity of helping them keep track of their materials.

Classroom Decorating Tip: Replace your word wall with a word "tree" to save wall space.Classroom ceilings totally under utilized and are a great place to find extra space in your classroom. After having a word wall that hogged all of my bulletin board space, I came up with the idea of making a word "tree" after seeing something similar in a pre-school classroom for hanging artwork. I bunched together some tree branches and I'll add more words as the year goes on. The sign hanging from my word tree says “Growing Our Content Knowledge.” You can see more pictures of my word tree and get tips for creating your own here. Beneath my word tree, you can see my fireworks tablecloth covering two of my filing cabinets. The wire basket on top will hold papers to be filed, a job I assign to students. You can also see one of my two bookcases filled with my color coded classroom library. You can read about the coding system I use here. My sister-in-law works for the Philadelphia Free Library system and is gracious enough to pick out the best donations to set aside for me. She has a boxful waiting for me to pick up so I will soon be adding even more books to my library.

Classroom Decorating Tip: Cover your walls with student work rather than spending money on pre-made decorations.Across the back wall of my classroom is my one and only, extremely long bulletin board. My expectations (rules) and negative and positive consequences are posted on the left. At the top are writing rubrics for constructed responses and essays. I'll hang writing exemplars below them as the year goes on. Across the top of the board are collages of the units in the ninth grade literature textbook my school district uses (plot & setting, character, narrator & voice, etc.). I made them my first year of teaching and still love them. At the bottom right of the board, I will post the Latin and Greek roots we cover throughout the year. On the right side of the board I will post the names of students who score mastery (80% or higher) on their assessments. All the rest of the space will be used for student work; that is the only thing that will change on my bulletin board throughout the year. It keeps things simple for me and students would much rather see their own work hanging up than some pre-made store bought decoration. Hanging up and taking down student work is another job I assign to students.

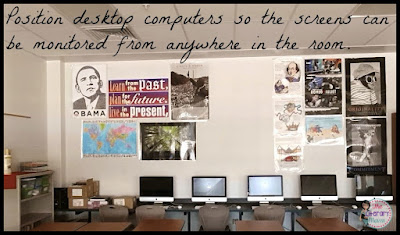
Classroom Decorating Tip: Position desktop computers so the screens can be monitored from anywhere in the classroom.I have five desktop computers in my room, which I try to use as frequently as possible for projects and writing. While I didn't really have a choice about where to put them (there is a countertop specifically for that purpose built in), if you have any in your classroom, you want to position them strategically so that you can see students' screens from anywhere in your classroom. This will eliminate a lot of off task behavior. Above the desktop are inspirational posters, many bought from AllPosters.com on Black Friday, as well as informational posters about Shakespeare and a Romeo & Juliet movie poster. That's the Shakespearean play taught in ninth grade. The empty space in the middle is for my citing evidence posters, which I will hopefully be creating this weekend. I have some ideas from Pinterest. The bookcase on the right holds student supplies and more books. I like student supplies to be out and accessible so students can independently get the materials they need.

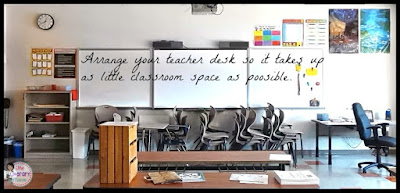
Classroom Decorating Tip: Arrange your teacher desk so it takes up as little classroom space as possible.The front of my room has my whiteboards and SmartBoard. I hate writing on the board so I usually just post my objectives and agenda on the board. Any notes I do are PowerPoints on my Smartboard. My desk is pushed in the corner to the right to create as much open space as possible. I never sit at it during class so it doesn’t matter that it faces away from the rest of the room. I also have one single student desk in case someone needs to sit all by themselves. Hanging above my desk are more posters from AllPosters.com. These are two works by two of my favorite artists. While I think too many posters and decorations can be distracting for students, I also think it is fine to have some decorations that are not content-related but help to give your room a homey feel and/or reveals some of your own personality.

I still hadn’t moved tables and chairs when I took these pictures because I was waiting to see what the final numbers on my rosters were. As of Friday afternoon, I had 32 at the most; on Thursday it was 36. I ended up arranging my tables into five groups of four and two groups of six with a large circular space in the middle. As I find out how many of those 32 or so show up, I may be able to move some of the tables out of the way to the back and/or front of the room to create more space. Looking forward to my first day with students!