December 30, 2014

Common Core Writing: Informational Writing

Informational writing, otherwise known as explanatory writing, often has interconnected purposes: to increase readers’ knowledge or to help readers better understand a procedure or process. Students, however, struggle to remain objective while conveying this information. Try out two different methods of summarizing to help student remain objective and focused on the most important ideas in a text.
This is my fifth in a series of posts about my online course, Common Core: Implementing the Writing Standards. In my first post, I gave an overview of the writing standards. In my second post, I showed how the gradual release process can be used with writing. In my third post, I explain why it is so important that basic writing skills be explicitly taught, no matter the age or grade level.

My fourth and most recent post focused in on argument writing, arguably (oh, I am so punny!) the most important of the three types of writing called for in the Common Core standards: argument, informational (this post's focus), and narrative writing (my next post).

Informational writing, otherwise known as explanatory writing, communicates information accurately. This kind of writing has one or more, often interconnected purposes: to increase readers’ knowledge or to help readers better understand a procedure or process. You can read more a more thorough explanation in the Common Core's Appendix A (page 23).

Informational writing strongly ties in with Informational and Literature Standards 1 & 2, citing evidence from the text and providing an objective summary. Objective. Meaning no one cares what you think or feel. Somewhere in middle school or elementary school someone taught my students to start everything they write with "I think" or "I feel" or "I believe." I am constantly reminding them there is NO first person in objective writing. Connected to that struggle is stating main idea, yes still a struggle in ninth grade. Again, main idea has nothing to do with what you think or feel; it is based on the facts of a text.

One way I practice summarizing and stating main idea is with "money" summary sentences. Students are given $2 to write a summarizing sentence. Each words costs 10 cents and words like a, the, of, etc. are free. Students' goal is to write a summary sentence that "spends" as close as they can get to $2 without going over.

I practice with this set of four passages, perfect for the gradual release process of "I do, we do,
two do, you do," but you could also try this strategy with any text you are reading in class. Tying it in to money makes it fun for students while pushing them to succinctly communicate the main idea. As students share their money summaries, I constantly ask them to self assess: "Is that the big idea or just a detail? Is that objective or does it include your opinions?"

Informational writing, otherwise known as explanatory writing, often has interconnected purposes: to increase readers’ knowledge or to help readers better understand a procedure or process. Students, however, struggle to remain objective while conveying this information. Try out two different methods of summarizing to help student remain objective and focused on the most important ideas in a text.
Once students have mastered a summary sentence or if I feel like that strategy just isn't working for some students, I will often use a second strategy for writing summary topic sentences. This is a three step method: identify the item (story/article) + a summary verb + finish your thought = summary topic sentence. The item, the title of the text, is given by the teacher and the summary verb is selected from a list, so the first two steps are low stress. The third and final part is what the student must come up with, the "finish your thought."

I provide sample summary topic sentences for students along with the list of summary verbs. Students then have four opportunities to practice with texts that they have read recently in class. You can assign the items or let students select.

Finally, students select two of their topic summary sentences to develop into full summaries. After your approval of their topic summary sentence, students will generate a fact outline. You may also want to check their fact outline before they proceed to writing their summary. I tell my students that their summary can only include the approved facts, no other ideas.

To get students excited about writing informational texts and to expose them to the features of effective informational writing, make sure your students are reading exemplary informational texts or "mentor" texts. Will they read boring stuff on standardized tests? For sure! So why subject them to boring stuff in class?

Mentor texts can and should be complex and difficult, but it doesn't have to be boring. All of the elementary school teachers out there are saying duh!, you should always use mentor texts, but this is a newer idea at the secondary level. For a great read on use of mentor texts (and even mentor sentences) at the secondary level, check out "Making the Most of Mentor Texts" by Kelly Gallagher. It's a topic that really deserves its own post.

Where to find great mentor texts? My go to place to find them is in magazines. I subscribe to a variety of magazines connected to my students' interests. I keep magazines in the classroom for independent reading and when issues get too old, they are always handy for collages or other projects. But before putting them out in the classroom, I skim them for articles I think might be good reads.

One example would be an article from a recent Sports Illustrated issue (in general SI has really strong writing, just keep that swimsuit issue out of the classroom), titled "Young, Gifted & Homeless." Anything about sports = 99% of my boys are now interested in reading, hooray! One of the article's strong features is its weaving of interviews with statistics, mixing narrative elements with fact. Another strong feature is the evidence of the author's careful research, drawing on a number of sources for information. After reading the article and discussing how it was written, students could choose their own topic to engage in writing, making sure to include those same features that made the mentor text effective.

I would love to hear about how you use informational writing and/or mentor texts in your classroom. Next up: narrative writing.

Informational writing, otherwise known as explanatory writing, often has interconnected purposes: to increase readers’ knowledge or to help readers better understand a procedure or process. Students, however, struggle to remain objective while conveying this information. Try out two different methods of summarizing to help student remain objective and focused on the most important ideas in a text.

December 29, 2014

Common Core Writing: Argument Writing

Writing argument essays can be a challenge for middle school and even high school students. Lack of quality information written at students' reading levels and access to technology to find that information are just two of the barriers. Try using text sets (provided readings) as you help your students craft their argument writing skills.
This is my fourth in a series of posts about my online course, Common Core: Implementing the Writing Standards. In my first post, I gave an overview of the writing standards. In my second post, I showed how the gradual release process can be used with writing. In my third and most recent post, I explain why it is so important that basic writing skills be explicitly taught, no matter the age or grade level.

Argument writing has a special place in the Common Core standards; it is listed as the first standard, before informational and narrative writing. As Common Core’s architect, David Coleman told a group of educators, the new writing standards are meant to reverse a pedagogical pendulum that has swung too far, favoring self-­expression and emotion over clear communication. “As you grow up in this world, you realize people really don’t give a shit about what you feel or what you think.” You can read more about why argument writing is so important in the Common Core's Appendix A (page 24 and 25).

So what is the difference between persuasive writing and argument writing? Evidence. While a persuasive essay might list the (very personal) reasons a teen should have a later curfew, an argument essay would have evidence from credible sources. Persuasive writing often relies on emotion, convincing the reader that the author is credible or that an issue should matter to the reader. Argument writing is all logic. To write an argument essay, students must be able to examine both sides of the issue, so that they have evidence to support their own viewpoint, but are also able to acknowledge and then refute opposing arguments.
Writing argument essays can be a challenge for middle school and even high school students. Lack of quality information written at students' reading levels and access to technology to find that information are just two of the barriers. Try using text sets (provided readings) as you help your students craft their argument writing skills.

Writing argument pieces with my students is a challenge for several reasons. The first and most important, is access to quality information at my students' reading levels. The Internet is a wealth of information, but as a ninth grader reading at a third or fourth grade reading level that information may be difficult to digest. The second challenge is having reliable access to technology. My school is pretty lucky to have a number of laptop carts in addition to a computer lab, but this year the number of students I have in a class exceeds the number of (working) computers in a cart or the lab.

To overcome these challenges and to support my struggling writers, I provided students with text sets on which to base their argument essays. My students were heavily impacted by the death of Trayvonn Martin last year (and Michael Brown this year), and I wanted them to have a better idea of how the justice system worked in our country so that they could make their own decision about whether it was fair or not. This led to the creation of a text set and argument essay focused on the fairness of the US justice system.

Before jumping into our readings on the US justice system, the students read "The Lady or the Tiger?", a short story by Frank Stockton. This got them thinking about how justice systems work and what makes them fair or unfair.

To help them better understand how the king's justice system works, I created a simulation. Each student was assigned a crime and guilt or innocence (which they keep secret at first). The students approached the doors of the "arena," selected one, and were punished or rewarded on the spot, just like in the story. A tiger or a lady appeared on the screen (with accompanying growling or a wedding march).

Once all the students received their fate, they then revealed their guilt or innocence. Students immediately noticed how many guilty people got married and how many innocent people were killed by the tiger. This was a perfect lead in to comparing the king's justice system to our own in the US. Doing a quick Venn Diagram will help you to assess how much your students already know of don't know about the US justice system, and to identify any myths or misconceptions they may have as well.

The first step of teaching argument writing is to introduce students to what argument writing should look like. Using a sample essay, students annotate the text, looking for an introductory statement, a thesis, topic sentences, facts and evidences, transitions, citations, an opposing argument, and a conclusion. Directions as well as explanations of each are alongside the sample essay.

This text set contains three articles about the American criminal justice system. The first is purely informational and covers how the court systems work. The second and third articles present different opinions; one article argues that the jury system is the best justice system out there (though not perfect) and the other article argues that our courts are terribly flawed. In reading this series of articles, students built their background knowledge of how the courts are designed to work and were exposed to both viewpoints.

Accompanying each article are instructions for annotation during reading as well as a graphic organizer for collecting key details and stating main idea. I find that my students can never get enough practice with identifying the main idea and saying it in their own words.

After reading all three articles, students brainstormed reasons why the US justice system is both fair and unfair. Even if students had already chosen a viewpoint, I made them generate ideas for both sides of the issue. This is extremely helpful when they must acknowledge and then refute an opposing viewpoint. At the end of their brainstorm, students select and state their position.

Once they chose a viewpoint to support, students organized their ideas in an outline. In their third body paragraph, students acknowledged an opposing viewpoint. Many students make the mistake of trying to support that opposing viewpooint rather than refute it, so watch out for that.

With a completed outline students moved on to drafting and then revising. Students annotated their own essay just as they did the sample essay at the start of the packet to ensure they have included all of the necessary components of an argument essay. Students then engaged in peer review and finally wrote a final draft.

Later in the year, my students wrote another argument essay, focused on teen's ability to make decisions, which built on the writing skills introduced in during the argument essay on the justice system. While I again provided a text set, students further developed their citation skills and sought additional sources outside of what I provided.

For other great suggestions on how to modify writing assignments for struggling writers, check out Teaching Argument Writing to ELLs. While the article is written with English Language Learners in mind, the strategies would work with any group of struggling writers.

Feel free to share your ideas and strategies for argument writing in the comments below. Next up, informational writing.

Writing argument essays can be a challenge for middle school and even high school students. Lack of quality information written at students' reading levels and access to technology to find that information are just two of the barriers. Try using text sets (provided readings) as you help your students craft their argument writing skills.

December 26, 2014

Common Core Writing: Writing is Taught, Not "Caught"

By the time students reach middle school and especially high school, there is this assumption that students know how to write. They have, after all, been doing it for five, six, seven, eight years, right? Wrong. Writing must be explicitly taught; it's not something to which students will just catch on.
This is the third in a series of posts about my online course, Common Core: Implementing the Writing Standards. You can read my first post about the introduction to the writing standards here and my second post about the gradual release process here.

This third post focuses on the idea that writing must be taught, not "caught." This is perhaps less of an issue at the elementary school level where students are being given basic instruction in how to write the alphabet, words, sentences, paragraphs. But by the time students reach middle school and especially high school, there is this assumption that students know how to write. They have, after all, been doing it for five, six, seven, eight years, right?

Wrong. My ninth grade history teacher had a very cute saying about what happens when you assume: you make an a** out of you and me (a** + u + me = assume), however, I am just a guilty as the next teacher of making assumptions about students' writing skills.

In my first year of teaching, I started the year by asking students to write an autobiographical piece. I knew I was in trouble when students struggled to select a topic substantial enough to write about. A general graphic organizer with guiding questions and space for recording the details to be discussed in each paragraph was somewhat helpful but still did not help students introduce and structure ideas within and between paragraphs. 

By the time students reach middle school and especially high school, there is this assumption that students know how to write. They have, after all, been doing it for five, six, seven, eight years, right? Wrong. Writing must be explicitly taught; it's not something to which students will just catch on.
I dragged my students through about four days of writing before I threw up my hands and moved on to other, more structured writing activities. Lesson learned. Instead of teaching my students how to write the way I wanted them to write, I behaved as if they would just catch on to what I wanted them to do.

This article, "The Writing Revolution," addresses the same topic and offers solutions. The school at the center of the article, New Dorp High School in Staten Island, New York, in 2008 identified bad writing as the barrier to their students' success. "Students’ inability to translate thoughts into coherent, well­ argued sentences, paragraphs, and essays was severely impeding intellectual growth in many subjects. Consistently, one of the largest differences between failing and successful students was that only the latter could express their thoughts on the page." 

Students who could not write well could not pass the Regents, New York's exit exam for high school students. Since 2008, many other states, including mine, Pennsylvania, are moving toward the idea of exit exams. In Pennsylvania, students in the graduating class of 2017 must pass the Keystones for Algebra 1, Biology, and Literature to receive a high school diploma.

At New Dorp, analysis of student writing revealed that students lacked knowledge of coordinating conjunctions to link and expand on simple ideas: like for, and, nor, but, or, yet, and so. Students also struggled to create complex sentences with dependent clauses: although, despite, however. These gaps in knowledge can be attributed to a change in how writing is taught. 

While fifty years ago, elementary­ school teachers taught the general rules of spelling and the structure of sentences, about twenty five years ago, schools took a different approach. Students were given interesting creative­ writing assignments. If students were writing as part of a fun, social context, they would “catch” what they need in order to be successful writers.

For solutions, New Dorp turned to the Windward School and its Hochman Program, in which students are "explicitly taught how to turn ideas into simple sentences, and how to construct complex sentences from simple ones by supplying the answer to three prompts—but, because, and so. They are instructed on how to use appositive clauses to vary the way their sentences begin. Later on, they are taught how to recognize sentence fragments, how to pull the main idea from a paragraph, and how to form a main idea on their own." Students are given a formula or recipe for writing, and once students understand these rules, they can then begin to break them.

At New Dorp, teaching writing became a focus across all subject areas. Students practiced using subordinate clauses in science class, specific prompts for discussion in English class, and transitional phrases to write a paragraph in history class. While critics worry about the loss of creativity and this focus on teaching writing has not solved all of the school's problems, New Dorp has seen positive growth and feels prepared for the Common Core shift.

When I look back at my attempt to jump write into writing autobiographical pieces my first year of teaching (I thought it would be fun and allow students to express themselves), I cringe. Certainly I could have first had students read and analyze a series of sample texts using the gradual release process. This would have allowed students to first identify and then employ the techniques used by skilled writers. 

However, even before that, I should have instructed students on basic writing skills, like how begin a response to a prompt. So many of my students struggled with how to start off that piece and many writing assignments that followed. About halfway through my first year I developed a lesson on turning a prompt into a statement.

The lesson began with direct instruction or the "I Do," where I showed students three steps to turning around a prompt.
Step 1: Cut off the “question words” to create a sentence stem and change your question mark to a period.
Step 2: Re-read the sentence stem, and add, move, remove, or change words if you need to.
Step 3: Re-read the sentence stem and complete the statement by answering the question.
While "TAG" was something my students claimed to be familiar with, I could not assume they actually knew how to do it.

Then I moved onto the guided practice or the "We Do," where students guided me through turning around a prompt using the three steps I had given them. This could be done multiple times if necessary. I then asked students to do a "Two Do," and work through one or a few prompts with a partner.

For the independent practice or the "You Do," I developed two sets of prompts. The first set allowed students to turn around a prompt and actually answer it (mostly opinion based questions).

The second set allowed students to turn around the prompt and think about how it would be answered (text-based questions). These prompts were much higher level than the first set, prompts similar to what they would be asked to answer on Common Core aligned state testing.

Did some of my students already have the knowledge and the skills to complete parts of this lesson? Yes, and these students could be paired with students who had no knowledge. Did more practice hurt them? No; being able to teach someone else solidifies your own understanding. 

Was this lesson an ah-ha! moment for many of my other students? Yes; it was as if up to this point they had been expected to catch on to this rather than being taught this. Did most students struggle with the higher level prompts? Yes, and that is when I came back to the "I Do" and modeled a higher level prompt. Were all of my students able to turn prompts into statements correctly 100% of the time after this? No, but now they had a formula to approach the prompt with. 

Even in late December, I still approach a student who has not started writing in response to a prompt with these three steps/questions: Did you take of the questions words? What do you need to change? What are you going to say to answer the question?

By the time students reach middle school and especially high school, there is this assumption that students know how to write. They have, after all, been doing it for five, six, seven, eight years, right? Wrong. Writing must be explicitly taught; it's not something to which students will just catch on.

December 21, 2014

Common Core Writing: Using the Gradual Release Process

The gradual release process, otherwise known as I Do, We Do, Two Do, You Do, allows students to slowly take responsibility for their learning. Read about how to use direction instruction, guided practice, collaborative learning, and independent practice with your students during your writing lessons.
This is the second in a series of posts about my online course, Common Core: Implementing the Writing Standards. You can read my first post about the introduction to the writing standards here.

In this post I will focus on the gradual release model, also discussed in the course introduction. In an article by Dr. Douglas Fisher, "The Effective Use of the Gradual Release of Responsibility Model," gradual release is broken down into its four components.

1. Focus Lessons (direct instruction or the "I Do") is when the teacher is modeling her thinking for students. These lessons should be short, set a purpose for learning, and build or activate background knowledge.

2. Guided Instruction (the "We Do") can be done as a whole class or in small group. The teacher prompts, questions, facilitates, or leads students through tasks similar to the one modeled in the focus lesson. Here the teacher is still working very closely with students, able to correct any misstep immediately. The teacher can also get a sense of who is "getting it" and who will need additional instruction.

3. Collaborative Learning (in my district there is a big push for this part to be in pairs rather than groups of three or four, so I call this the "Two Do") allows students to work through the learning with their peers. Discussion with peers means students are using language as a part of learning, which Fisher notes is critical. Having students work in pairs means more students have more time to talk. Collaborative learning, whether pairs or groups, should function in a way that allows for individual accountability, ever the challenge. During collaborative learning, the teacher has the chance to monitor the room, listen in on discussions, and continue to gather formative data on who "gets it" and who doesn't.

4. Independent learning (or the "You Do") allows students to individually apply their learning in new ways, furthering their understanding

One of Fisher's most important points is that the gradual release model is NOT a linear process. Steps 1, 2, 3, and 4 do not always happen in that order. Teachers may come back to focus lessons as gaps of knowledge or misconceptions are discovered during guided practice and collaborative learning. Struggles during independent practice may call for additional guided practice.

In a recent short story unit, I used the gradual release model to teach students about the narrative elements that effective writers employ to engage readers such as foreshadowing, flashback, setting and character description, blocking, etc. I first modeled the analysis of these elements with "Thank You M'am" by Langston Hughes. For guided practice, students helped me to analyze these same elements in "The Jacket" by Gary Soto. Students worked in small groups to analyze "The Family of Little Feet" an excerpt from "The House on Mango Street" by Sandra Cisneros. I ensured accountability by using a silent discussion technique (see an example and read more about that here). Finally, students independently applied this analysis to their own narrative nonfiction writing.

If you are you are looking for more effective use of the gradual release process in your own classroom, try pairing this Practice with Writer's Style and Poetry Analysis Essay on Writer's Style: A Step by Step Guide.


Practice with Writer's Style includes two practice worksheets, each with four passages for analyzing the aspects of writer's style: diction, sentence structure, language choices, and tone. The first worksheet includes four passages on the same topic, so students can see how differently the same idea can be written about.

The second worksheet includes excerpts from famous writers like Ernest Hemingway and William Faulkner. A focus lesson could be done with the first passage on each worksheet, guided practice done with the second passage, and collaborative practice with the third and fourth passages.

For independent practice and a chance for students to apply their new knowledge about writer's style, use this Poetry Analysis Essay on Writer's Style: A Step by Step Guide. Students will select a poet and three of his/her poems to analyze.

After analysis of three poems, students will then write a thesis summing up the poet's style and outline their essay.

The essay packet also includes additional practice with writer's style (a linked video of a young poet), sample thesis statements and topic sentences, a structured introductory paragraph, and a sample essay.

Next up: Writing isn't caught, it needs to be taught.

The gradual release process, otherwise known as I Do, We Do, Two Do, You Do, allows students to slowly take responsibility for their learning. Read about how to use direction instruction, guided practice, collaborative learning, and independent practice with your students during your writing lessons.

December 20, 2014

Common Core Writing: Introduction to the Standards

New to the Common Core writing standards or just confused? This post, the first in a series of ten, is an introduction to the standards and will explain their organization and how they build on each other from grade level to grade level.
Through my school district I had the opportunity to take an online course through Knowledge Delivery Systems. I have taken several courses with them over the past two years, including Assessment and Grading for Student Achievement, Supporting Struggling Students with Rigorous Instruction, Motivating and Engaging Students, and Common Core in ELA: Instructional Shifts for Effective Implementation, Grades 9-12. Three out of four of my previous courses were helpful so I was excited to get the chance to take another.

This course, Common Core: Implementing the Writing Standards, was broken down into 8 units:
Unit 1: Introduction to the Common Core State Standards for Writing
Unit 2: Writing Opinions/Arguments
Unit 3: Writing Informational/Explanatory Texts
Unit 4: Writing Narrative Texts
Unit 5: Research and Writing
Unit 6: Writing Across the Content Areas
Unit 7: Assessing Student Writing
Unit 8: Epilogue

In a series of posts (approximately one per unit) I hope to share what I learned and how I apply (and you should too!) this information in the classroom.

Unit 1: Introduction to the Common Core State Standards for Writing began by looking at the actual standards. The standards can be found here. The Writing standards are broken down by grade, with 9-10 and 11-12 banded together. The introduction overviewed what is common in the Common Core. Regardless of grade level, there are ten standards for writing and each standard touches upon the same skill, it just builds over time.

New to the Common Core writing standards or just confused? This post, the first in a series of ten, is an introduction to the standards and will explain their organization and how they build on each other from grade level to grade level.
Let's look at Writing Standard #3. In Kindergarten, students will "Use a combination of drawing, dictating, and writing to narrate a single event or several loosely linked events, tell about the events in the order in which they occurred, and provide a reaction to what happened."

By Grade 3 for the same standard, students will "Write narratives to develop real or imagined experiences or events using effective technique, descriptive details, and clear event sequences." At the Grade 3 level the standard is broken down into more specific sub-standards, which include introducing narrator and character, using dialogue, and signaling event order using temporal words and phrases.

By Grade 6, students will "Write narratives to develop real or imagined experiences or events using effective technique, relevant descriptive details, and well-structured event sequences." The language is very similar to Grade 3, except now descriptive details must also be relevant and event sequences are well-structured instead of just clear. At the Grade 6 level the standard is also broken down into more specific sub-standards, which require greater use of descriptive details and a variety of transition words and clauses.

By Grade 9-10, students will "Write narratives to develop real or imagined experiences or events using effective technique, well-chosen details, and well-structured event sequences." Details are now well-chosen instead of just relevant and clear. The more specific sub-standards for Grades 9-10 allow for the possibility of multiple points of view and plot lines.

As you can see while the standard has increased in complexity from Kindergarten to Grade 3 to Grade 6 to Grades 9-10, the standard remains focused on narrative writing. Why is this important to know? Being able to see how the skill builds over time allows you to see what a student should already know as well as the direction they are moving in. While struggling students may need past instruction repeated, students should not be being taught skills in which they are already proficient. For those students who are struggling, you can pinpoint what grade level their writing skill are at and work up from there to their current grade level.

Next up: Using gradual release with the writing process.

New to the Common Core writing standards or just confused? This post, the first in a series of ten, is an introduction to the standards and will explain their organization and how they build on each other from grade level to grade level.


December 10, 2014

Word Trees: Save Precious Wall Space with a Hanging Word Wall

Decorate your classroom a little differently this year by making a "word tree" instead of a word wall. Use it to hang vocabulary or display student work in a visually interesting way without using up any precious wall space.
Some people have word walls, I have a WORD TREE!

Long ago I found that there is never enough wall space to hang things: posters, rubrics, student work, etc. and a word wall is on the classroom setup checklist for my school.

It is something administrators are always looking for, but by the end of the year I find that my word wall is taking up way too much of my bulletin board space.

After seeing something similar in a pre-school classroom for hanging student artwork, I came up with the space saving idea of hanging my word wall from a word tree.

First I collected some dead tree branches and tied them together at one end to create a "tree." Make sure
Decorate your classroom a little differently this year by making a "word tree" instead of a word wall. Use it to hang vocabulary or display student work in a visually interesting way without using up any precious wall space.
there aren't any critters hanging out in your branches before you bring them into your school.

Then using those wonderful clips for drop ceilings, I hung my tree. As the year goes on, I hang the words back to back (again to save space).

If you aren't allowed to staple or tape things to your walls, this tree is perfect for your vocabulary or showcasing student work. I love that this saves me wall space, but also makes my classroom more visually interesting.
Click here for a copy of my "Growing Our Content Knowledge" sign to hang from your own word tree. The text and image are printed twice so you can cut the page in two, glue the pieces back to back, and then hang from your tree.

Decorate your classroom a little differently this year by making a "word tree" instead of a word wall. Use it to hang vocabulary or display student work in a visually interesting way without using up any precious wall space.

December 9, 2014

Word Webs: A Vocabulary Activity with a Twist

Looking for a new vocabulary activity to engage your middle school or high school students? After students make webs of their vocabulary words, have their partners try to guess the word. Read on for directions and samples.
This year our school bought vocabulary books to be used in all of the 9-12 English classes. We looked at several different options at the end of last year and settled on Sadlier-Oxford’s Vocabulary Workshop. The series has multiple levels so each grade level has a different book, but all share the same structure.

Each unit begins with a passage that uses of majority of the twenty words in the unit (usually 16 out of the 20). These nonfiction passages are usually on topics of high interest to students. When we read these passages in class, I try to find a short video clip to pair with the reading to help bring the topic to life even more for students.

When we read the passage aloud in class, I ask the students to use Cornell Notes to help them process the vocabulary terms and main ideas in the text. In the left hand column, we record the key ideas. I usually stop the students at the end of each paragraph or two and ask them what important things we have read so far. In the right hand column, we record the vocabulary terms (in bold in the reading) and our predictions about the words’ meanings based on context clues.
Looking for a new vocabulary activity to engage your middle school or high school students? After students make webs of their vocabulary words, have their partners try to guess the word. Read on for directions and samples.

I like this way of previewing the vocabulary terms because then the students have the definitions in student-friendly terms and can use these notes to help them complete their homework exercises, two of which are writing prompts which refer back to ideas in the reading passage.

This past week, I decided to change it up and preview our new vocabulary terms in a different way. While I think the Cornell Notes is really effective, doing them every other week as a whole class bores some of the students and too many students choose to be passive participants. While I cold call on all of the students at least once during our whole class note taking, in a large class that leaves a lot of the time that students may not be actively following along.

To increase participation and engagement, this week I tried having the students create word webs using their new vocabulary terms. The students were instructed to select four of their twenty vocabulary terms for which to create word webs. Each word web could include:

*part of speech
*definition (in their own words)
*a synonym
*an antonym
*an example
*a non example
*an original sentence
*an illustration (stick figures and word bubbles is always fine)
Looking for a new vocabulary activity to engage your middle school or high school students? After students make webs of their vocabulary words, have their partners try to guess the word. Read on for directions and samples.

I asked my students to use at least four of the options above in each word web. If you ask students to include synonyms and antonyms or examples and non-examples, you may want to ask students to label each part. The twist to these word webs is that the vocabulary term should NOT be a part of the word web. This gives a partner the chance to identify the vocabulary term based on the clues of the web.

I sampled the process for my students with a vocabulary term from the previous unit, “accomplice.” Together we discussed what part of speech the word would be, a definition, a synonym, an antonym, an example, a non example, an original sentence and an illustration. Then I set the students off to create their own.

After about 15 – 20 minutes, I asked students to switch their webs with a partner and determine the vocabulary term depicted in each web. When students switched back, they “graded” their partners’ accuracy and shared their scores with each other. This allowed the students to feel successful in two ways: they learned how well they did in determining their partners’ webs and also how clear their webs were for their partner to solve. The students had fun doing this and I will definitely do it again with them. This activity is great reinforcement for visual learners and could be used with any subject or grade level. You can find all of my resources for teaching Sadlier-Oxford and other vocabulary here.

Looking for a new vocabulary activity to engage your middle school or high school students? After students make webs of their vocabulary words, have their partners try to guess the word. Read on for directions and samples.


December 8, 2014

Character Silhouettes: A Creative Close Reading Activity for Fiction & Nonfiction Texts

Creating character silhouettes is a creative way to conduct a close reading of character or figure from an assigned or selected fiction or nonfiction text. This activity can be used with any grade level, during or after reading any text, and reinforces the ideas of character and characterization while asking students to closely examine evidence from the text.
Creating character silhouettes is the perfect activity for the close reading of character or a figure from an assigned or selected fiction or nonfiction text.

Like literary postcards, character silhouettes are an activity that can be used with any grade level and can be used to reinforce the ideas of character and characterization. This activity can be done during or after reading with any short story, novel, play, or nonfiction text.


November 15, 2014

Simplify Parent and Student Communication with Remind

Wouldn't you love to be able to make less phone calls and contact all of your parents or students at once? As teachers, our time is so precious because we always seem to have so little of it, yet so many things to accomplish, so you should know about Remind. It is a tool that will make communication with parents and/or students easier.
As teachers, our time is so precious because we always seem to have so little of it, yet so many things to accomplish, so you should know about Remind. It is a tool that will make communication with parents and/or students easier.

Wouldn't you love to be able to make less phone calls and contact all of your parents or students at once? Remind allows you to keep in touch with parents and/or students without them having your cell phone number or you needing theirs.

The sign up process is simple and you can use your Google login, so then there is no extra username and password to remember.

Before your users can sign up, you need to decide how many classes or groups you will have and create each one.
Wouldn't you love to be able to make less phone calls and contact all of your parents or students at once? As teachers, our time is so precious because we always seem to have so little of it, yet so many things to accomplish, so you should know about Remind. It is a tool that will make communication with parents and/or students easier.

Because I teach high school, I have one class/group for all of my parents and then separate classes for each of the class periods I teach during the day (English 1 Period 1/2, English 1 Period 6, Creative Writing Period 4, English 1 Honors Period 7/8).

This allows me to send important messages to all of my parents at once about important dates and reminders (conferences, concerts, marking periods ending).

I set up separate classes for each period I teach so I could send out different messages as needed about homework, supplies, etc. You can always play around with just one class and add more as you go on.

Once you have created a class, there are two ways people can sign up and join that class. The first option asks the individual signing up to send a text message to the phone number listed with the message listed. Make sure the message entered is exactly what is displayed on the screen (yes they need to put in the @ symbol).

If done correctly, the service will send a text message back letting them know that enrollment was successful and asking for their name. After that, there is no reason to text that number again.
Wouldn't you love to be able to make less phone calls and contact all of your parents or students at once? As teachers, our time is so precious because we always seem to have so little of it, yet so many things to accomplish, so you should know about Remind. It is a tool that will make communication with parents and/or students easier.

You may want to let parents and/or students know that that number is NOT your phone number and they cannot reach you through it. It is for sign-up purposes only.

You can print a PDF of this invitation to hand out to students or parents. I included it in my syllabus packet at the start of the year. You can also display it in class and give students time to sign up then or display it at Back to School Night or conferences for parents.

The second option is to encourage students and/or parents to sign up is by sending the invitation directly to their email. Simply list the email addresses of all of the individuals you want to include and the invitation with directions will be sent to them.

Once you have your classes all set up and people subscribed, on your home screen you will see all of your classes on the left and all of your subscribers on the right.

The top center is where you select who a message will be sent to (you can select multiple classes), write the message and either send it or schedule a day and time for it to be sent. The bottom center lists all of your sent and scheduled messages.
Wouldn't you love to be able to make less phone calls and contact all of your parents or students at once? As teachers, our time is so precious because we always seem to have so little of it, yet so many things to accomplish, so you should know about Remind. It is a tool that will make communication with parents and/or students easier.


So what kind of messages do I send? To parents I send reminders about Back to School Night, report card conferences, upcoming school events (concerts, sporting events, etc.), and upcoming due dates for projects, tests, etc.

Because you can schedule the messages ahead of time means no last minute rush to notify parents of report conferences the next day. Schedule your message now, or schedule all of your messages for that kind of thing if you know the dates ahead of time, and forget about it.

To students, I send a nightly message about homework. Because I plan out my homework on a monthly/unit basis I also schedule these in advance in chunks at a time.

I also send out the occasional shout out, praise, or encouragement to a few students or to a class (you can't send messages to one individual).

Some other features that I haven't really tried out yet are the "stamps," attachments, and voice clips. When you send out a message or a message with a question, users can "stamp" to show their response. You can also attach photos, documents, or PDFs. Let's say you are reminding students and/or parents about an upcoming test; attach the review sheet to the message.
Wouldn't you love to be able to make less phone calls and contact all of your parents or students at once? As teachers, our time is so precious because we always seem to have so little of it, yet so many things to accomplish, so you should know about Remind. It is a tool that will make communication with parents and/or students easier.

If you download the Remind app you can send voice messages, not just text messages. You don't have to download the app onto your phone though to use Remind; everything can be done online just as easily and the best part is that it is completely FREE.

I hope that you will try out Remind and that it will make at least one part of teaching easier for you!

Wouldn't you love to be able to make less phone calls and contact all of your parents or students at once? As teachers, our time is so precious because we always seem to have so little of it, yet so many things to accomplish, so you should know about Remind. It is a tool that will make communication with parents and/or students easier.

November 14, 2014

Introducing Text Annotation Using the Gradual Release Process

Students can struggle with reading for a variety of reasons: rich vocabulary, lack of background knowledge, the author's writing style. To scaffold difficult texts, teach students to annotate through the gradual release process.
A guest blog post by Lisa Jarvis, Homegrown Teacher

Students can struggle with reading for a variety of reasons: rich vocabulary, lack of background knowledge, the author's writing style. And all of these are reasons why students may struggle with O. Henry's "The Gift of the Magi." Therefore, it is vital that the teacher scaffold this text.

I use a close reading activity with this short story to have students work on how to annotate a piece of text. It asks students to highlight unfamiliar vocabulary, key details about the setting, and examples of characterization. This is important as the students analyze how these elements impact the plot. Finally, this story is a great way to either introduce or review allusions to the students.

Students can struggle with reading for a variety of reasons: rich vocabulary, lack of background knowledge, the author's writing style. To scaffold difficult texts, teach students to annotate through the gradual release process.
After teaching for six years, I have learned a lot about classroom management and the delivery of an effective lesson. One way in which I accomplish both of these tasks is through the gradual release process.

This process is essential in helping the students learn or understand any new concept. It follows the ME/WE/TWO/YOU pattern. This pattern can be completed within one piece of text or multiple texts.

In this example, I divide up the text and start with a think aloud. I read the text to the students and state my thoughts aloud to the students as to why I am highlighting certain elements and what/why I am writing in the margins. The key is to have students writing in the margins, not just highlighting. I continue the process as a class, with partners, and then the students finish the text by working independently.
The most rewarding part is that by the time the students get to the individual section of the activity, most feel confident enough annotate the text by themselves and do a decent job at it. I know that in a time crunched society time is of the essence, but believe me, it is time well spent! Your students will appreciate it!

Students can struggle with reading for a variety of reasons: rich vocabulary, lack of background knowledge, the author's writing style. To scaffold difficult texts, teach students to annotate through the gradual release process.


November 6, 2014

Improving the Writing Process (or Why I'm Loving Google Drive)


Using Google Drive, specifically Google Docs, has greatly improved the writing process in my classroom. No more lost assignments and making extra copies, but more importantly, students are now much more willing to engage in the revision stage of the writing process.
This year I am trying to go as paperless as possible with the writing process with my students, or
perhaps a better way to say it is I am trying to go as copy-less as possible.

In the past when we were working on an essay, I would have a step by step packets put together for all of my students. These packets were great because all of the materials were done and put together at the start, no last minute creating of documents. Students who were ahead or behind had all the papers and directions they needed. Like I said, these packets were great until students lost them and days of work disappear.

Using Google Drive, specifically Google Docs, has greatly improved the writing process in my classroom. No more lost assignments and making extra copies, but more importantly, students are now much more willing to engage in the revision stage of the writing process.This year I am not jumping right into essays. I am using the writer's workshop model to work on stories that matter with my students (that should sound familiar to all you elementary teachers using Lucy Caulkins resources).

My hope is that after writing stories and poems that connect directly to their life experiences and increased exposure to the writing process of drafting, revising, editing, and publishing, students will be able to incorporate the writing skills and techniques into later essays and larger writing assignments.


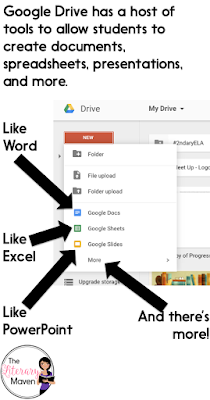
So where does the paperless/copy-less part come in? For as much of the writing process as possible, I use Google Drive. Instead of handing out paper copies of assignments, I share the document with the students on Google Drive. 

Like the packets I loved so much, everything is in one place for students, but the big difference is that students can't lose the assignment, which means their hard work never disappears and I never have to make extra copies.

Students then write their draft in Google Docs, a Google Drive app similar in function to Microsoft Word. I can comment, make suggestions for revisions, and directly edit their papers in Google Docs. 
Using Google Drive, specifically Google Docs, has greatly improved the writing process in my classroom. No more lost assignments and making extra copies, but more importantly, students are now much more willing to engage in the revision stage of the writing process.

During peer review, students can share their writing with each other using Google Docs and then make comments and suggestions.

When sharing with others, Students have the option of letting those individuals edit, comment, or just view the files they are sharing. I would suggest having students select comment so that their peers are offering suggestions rather than making direct changes to their work. This will also help you resist the temptation of fixing any errors for them.

My favorite part of Google Drive is that once a file is shared, it is always visible. There is no resending each time changes are made. 

My other favorite part is that Google Drive is connected to your Gmail account so it can be accessed anywhere. When a writing assignment is due, there is no scramble to print or excuses of "I forgot to email it."

Tip: If your students do not already have Gmail accounts and have to create them, ask them to write down their usernames and passwords on index cards. Collect those cards and hold onto them because someone will always forget their username, password, or both. Always.
Using Google Drive, specifically Google Docs, has greatly improved the writing process in my classroom. No more lost assignments and making extra copies, but more importantly, students are now much more willing to engage in the revision stage of the writing process.

If you teach lower grade students and don't want them all to have email addresses, you could create a class email address that all students could log in to in order to use Google Drive.

Google Drive allows you to create documents, but also presentation slide shows, forms, spreadsheets, etc. To learn more about these Google Apps and others, check out this summary of a recent #2ndaryELA chat about Google Apps for Educations. The summary includes teachers favorite apps and features, how they use then in the classroom, and apps and add-ons they'd like to try out next.

If you have any questions about Google Drive or want to share how you use it in your classroom, please leave a comment below.

Using Google Drive, specifically Google Docs, has greatly improved the writing process in my classroom. No more lost assignments and making extra copies, but more importantly, students are now much more willing to engage in the revision stage of the writing process.