October 28, 2014

How to Build Positive Parent Partnerships From the Very First Day of School

Start building positive parent partnerships from the very first day of school and maintain communication with parents throughout the year by sending home a syllabus, creating a parent contact log, and calling as much for the positives as the negatives.
I teach in a comprehensive urban high school. My students are the ones who weren't accepted to a lottery-based or selective admission high school in our district. Translation: my students are the ones no other school wanted, often because of their behavior issues.

Managing behavior consumes a lot of my time, sometimes more time than lesson planning and teaching, so being able to quickly and easily contact parents is important. I need parents to work with me to support their child and in order for that to happen, I start building a relationship with them from the very first day of school. This is important regardless of the "type" of students you teach. Here are some tips on how to do that.

Tip 1: Attach parent and student surveys to your syllabus. These should be handed out on the first day of school and ask for parent contact information. Make it count for a grade so students have an incentive to return it. I also give out copies of the survey at Back to School Night to any parents who have not yet filled it out. You can find printable, editable, and Google Form versions of my parent and student surveys here.

In my parent survey, I collect contact information, but also give parents the opportunity to share their child’s strengths and weaknesses, how their child learns best, possible distractions for their child, and any other important information they might want to share. Parents will often share information about medical conditions, past or present emotional or traumatic experiences the student may be dealing with, etc. As this type of information may not even be a part of a student’s file, I find this information invaluable.

Tip 2: Call all parents on the first day of school. If that isn't feasible, shoot for at least the first week. This allows you to introduce yourself and create a positive relationship before any problems arise. This is also how I figure out which students' phone numbers don't work and can start working on finding ones that do work.

Start building positive parent partnerships from the very first day of school and maintain communication with parents throughout the year by sending home a syllabus, creating a parent contact log, and calling as much for the positives as the negatives.
Tip 3: Save parents' numbers in your phone. This will save you time later when you are hunting for a number AND you can call parents anywhere: at school, at home, sitting in the parking lot, waiting in line somewhere. I do a lot of calls on my drive home from school with my hands-free headset. Another plus is when parents call you back, you'll know who is calling if the number is saved in your phone.

Tip 4: Log all of your parent contact for documentation purposes. Everything you do is to help your students but you also can never do enough to protect yourself. When I first started teaching, I would create a word document for each of my students where I kept a running log of each phone call, email, detention, conference, etc. When a student's behavior warranted disciplinary action, I had a whole list of the interventions I put in place before referring the student to the dean or principal.

Navigating through all of those Word documents became cumbersome, so now I use a Google Form version where I can enter all parent communication and then create a spreadsheet which can be sorted, downloaded and printed as needed. You can find printable, fillable PDF form, and Google Form versions of that parent contact log here.

Tip 5: Call before little stuff becomes big stuff, and call for the good stuff too. Don't wait until that student who is growing increasingly hostile explodes on you. A phone call home may reveal a larger issue out of your control, but if you know about it you can be a little more sensitive to a student's needs or emotional state.

If it's negative, I can't emphasize the importance of calling over emailing a parent. Tone can be misinterpreted in emails, while in a phone call, parents can hear your desire to work with them to help their student. You can always send a follow up email afterwards to document the conversation.

And parents don't want to just hear from you when their child is acting up. Try to make positive phone calls every so often about good behavior, good grades, etc. to maintain a positive relationship with your parents.

Start building positive parent partnerships from the very first day of school and maintain communication with parents throughout the year by sending home a syllabus, creating a parent contact log, and calling as much for the positives as the negatives.


October 27, 2014

Exit Tickets: A Quick, End of Class Formative Assessment

Using exit tickets at the end of class as a formative assessment helps you to plan and adjust the next day's lesson. Use one of these four standardized exit tickets, which can be used with any lesson in any subject area, or let students select one of the four to which to respond.
Having routines at the beginning and end of class is key. I use warm ups (also known as bell ringers or do nows) at the start of class and exit tickets (also known as closings) to wrap up the period.

Warm ups are a way to get students engaged in learning from the moment they enter the class room and give you, the teacher, a few minutes to get things ready for the day's main lesson or activity. Exit tickets help you to plan and adjust the next day's lesson.

Right now my warm ups and exit tickets focus on our vocabulary units. I usually pre-make a PowerPoint of one or two weeks worth of warm ups and exit tickets at a time. I can easily flip back and forth between the slides for that day's warm up and exit ticket as one class exits and a new class enters.

Using exit tickets at the end of class as a formative assessment helps you to plan and adjust the next day's lesson. Use one of these four standardized exit tickets, which can be used with any lesson in any subject area, or let students select one of the four to which to respond.
But sometimes what I planned for the exit ticket doesn't work because the class didn't quite finish a lesson, we ended up working on a different skill, etc.

For those instances  I created these four standardized exit tickets that can be used with any lesson in any subject area. Sometimes I use one of the four and other times I let the students select one of the four to which to respond.


I printed, laminated, and hung these four standard exit tickets above my whiteboard so that even if there is just one minute left in class, I can point to one of the four and ask students to complete it before leaving class. I also have these saved as a PowerPoint so I can display one or the set of four on my SmartBoard.

All four choices are intentionally very short because keeping track of time during lessons is one of my weaknesses.

However, the short length also allows me to quickly read through student responses to see who's got it and who doesn't. I stand at the door as my students exit to collect their exit tickets and then once my next class is seated and working on their warm ups, I can look through the exit tickets from the previous class.

Using exit tickets at the end of class as a formative assessment helps you to plan and adjust the next day's lesson. Use one of these four standardized exit tickets, which can be used with any lesson in any subject area, or let students select one of the four to which to respond.
I usually sort out the who's got it and who doesn't and immediately recycle the ones for the students who understand. For the students who struggled, I hold onto those exit tickets and know that those are students I need to check in with during the next day's class or perhaps pull for a small group lesson.

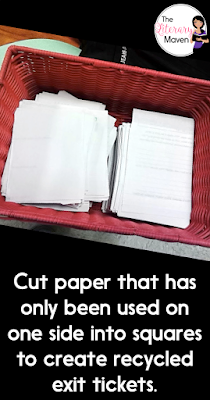
While occasionally I will make and print exit tickets with a specific format, I usually just use squares of recycled paper. I save any paper that's only used on one side and collect all the one-sided copies left behind in the copy room.

Once I have acquired a nice size stack, I use the paper cutter at school to cut the paper into four and use those squares as exit tickets. I keep stacks of the squares contained in the basket near the door so I can easily hand them out or have a student helper do so.

I love using exit tickets as a quick informal assessment at the end of class, but can't imagine using fresh paper to create something that will only be used once. For your own set of these standardized exit tickets, click here.


Using exit tickets at the end of class as a formative assessment helps you to plan and adjust the next day's lesson. Use one of these four standardized exit tickets, which can be used with any lesson in any subject area, or let students select one of the four to which to respond.


October 24, 2014

Silent Discussion Strategy: Engaging All Students' Voices

Using a silent discussion strategy allows for all students' voices to be heard and for the assessment of individual understanding of a text. Students practice agreeing or disagreeing and providing textual evidence just as they would in an oral discussion.
Some students love to talk and in a class discussion, they dominate. Other students are happy to sit back and just listen, and these are the students I'm always wondering about. Are they really too shy to speak in front of their peers or do they not have anything to say? How do I know if they understood the text we're discussing?

As a solution, I came up with a "silent discussion" strategy, which combines aspects of the carousel and a double entry journal. When using a carousel, students move around the room responding to different prompts. You can read more about that technique here.

In a double entry journal, you select a quotation from a reading, which is written in one column of a page, and write a response to the quotation, which is written in the other column of the page.

During the Philadelphia Writing Project's summer Institute, we modified this technique by passing around our quotes and responses for others to read add their own responses. I enjoyed the opportunity to read others' responses and compare them to my own. I thought my students might also enjoy the experience.

Earlier in the school year, I tried used TodaysMeet to hold a classroom discussion as a whole, and while students liked it, many complained that too many other people said what they wanted to say; they didn't want to be repetitive. It was a valid complaint, so I knew I wanted this "silent discussion" to take place in smaller groups.

Our "silent discussion" was going to focus on a vignette from The House on Mango Street titled "The Family of Little Feet," so I created a set of six prompts that would focus students' discussion on key elements in the story: figurative language and the shifting tone.
Using a silent discussion strategy allows for all students' voices to be heard and for the assessment of individual understanding of a text. Students practice agreeing or disagreeing and providing textual evidence just as they would in an oral discussion.

Since I created six prompts, I broke students up into groups of six, so each student would have a prompt to be responding to at all times. Ideally, the number of prompts should equal to the number of the students in a group so everyone is engaged, but it's okay to have more prompts than students.

Before beginning our silent discussion, students had about ten minutes to read the vignette in class. You could also assign the reading as homework the night before. Then, for round one of our "silent discussion" students had five minutes to respond to the first prompt, providing evidence from the text to support their answer. I also asked students to put their name or initial next to their response so students in their group could refer directly to them in later responses when agreeing or disagreeing.

When the five minutes for round one was up, students passed to the left or right (this direction needs to be consistent throughout the discussion. Now each student had a new prompt to which one other student had responded. In round two, six minutes long, students needed to read the first response and agree or disagree before providing their own response and differing or additional evidence.

In subsequent rounds, the amount of time continues to slightly increase as students have more responses to read over before writing their own. Using a timer increases the sense of urgency and decreases chatter while writing. It does become more and more challenging for students to find evidence other students haven't already mentioned so make sure the prompts you choose can be supported in a number of ways so students don't become repetitive.

This was my first time using this strategy and I was impressed with its success. Students who are resistant to engaging in oral classroom discussion and students who are often off task in class were focused and participating. Students were courageous enough to agree and disagree with their peers and as asked, provided evidence from the text to support their arguments.

This strategy also allowed students to work together as a group while ensuring maximum participation. I sometimes struggle with finding ways to create meaningful individual roles for students in groups to ensure that all members are contributing to the group's work. For example, when we do vocabulary review, I allow students to work in teams and I monitor the room, listening to the conversations teams are having, but at the end of the class I cannot concretely assess each individual students' understanding.

At the end of the class after using this strategy, I could read over what each individual student "said" and assess their understanding of tone and figurative language as well as their general comprehension of the short story. You can find the silent discussion prompts and the rest of this lesson on narratives here.

Using a silent discussion strategy allows for all students' voices to be heard and for the assessment of individual understanding of a text. Students practice agreeing or disagreeing and providing textual evidence just as they would in an oral discussion.

October 13, 2014

Literary Postcards: Writing From A Character's Point of View

Literary postcards are a great activity to reinforce the ideas of character and point of view in any novel or short story and can be used with any grade level.
Looking for a way to reinforce the ideas of character and point of view? Literary postcards are a great activity for any grade level.

I teach 9th grade English (don't be misled by some of the sample drawings and writing below) and my students completed this activity at the end of reading a novel in their literary circles.

Students had a choice of five coming of age novels (Sunrise Over Fallujah, Split, The Skin I’m In, Standing Against The Wind, and The Fortune of Carmen Navarro) and were grouped based on their choice. While all of the books deal with growing up and maturing, several also death with issues of abuse and bullying which are so important for teenagers to read about and discuss.